Matlab has some nice built-in features that make it convenient to experiment with images. This part of the assignment will introduce you to several of these features.
A repository of images is growing in the directory
/cs/cs153/Images and its subdirectories. For example, there is a
test image named /cs/cs153/Images/a1/testimage.jpg .
Matlab can read TIFF files, JPEG files, and a number of others. Try loading testimage.jpg by typing the following into an m-file and then running it (or by simply typing each line into the matlab prompt in turn):
A  = imread('/cs/cs153/Images/a1/testimage.jpg','jpg');
I  = image(A);
You should see an image, though it may not look quite right -- first,
we'll look at the variables above and then some of the (possible) display
problems. The variable A is the image. It is a "3-dimensional
matrix" (three 2d matrices, one for each of the red, green, and blue color
bands) that holds all of the pixels of the image. For example, the axes
demonstrate that the upper-left corner of the image is pixel (1,1). That pixel
has three components: a red value, a green value, and a blue value. Those
components are stored in A(1,1,1), A(1,1,2), and
A(1,1,3), respectively. You can check them out together by typing > A(1,1,:)I think all three color channels are the same for this first pixel in the upper left. As a result, that pixel must be a shade of gray. (Notice that the image pixels are labeled with a slightly unusual coordinate system: x runs from left to right, but y runs from top to bottom, rather than vice versa.) This is typical in vision and graphics.
Changing Images You can also change the image pixels and then review the image. For example, running this code (in an m file is easiest, though not necessary)
for i = 1:1:10,
  for j = 1:1:10,
    A(i,j,:) = [0 255 0];
  end
end
will change a 10x10 square of pixels at the upper left of A to be
all green. Include your altered image below:
In fact, you can take advantage of matlab's support for indexing into matrices. For example, you can accomplish the same change to the image (putting a green square in the upper left) with the following three lines:
A(1:10,1:10,1) = 0;
A(1:10,1:10,2) = 255;
A(1:10,1:10,3) = 0;
This takes advantage of the fact that when you assign a scalar to a vector or matrix, matlab automatically places that scalar into each component of the destination array. Unfortunately, the following code will not work (matlab isn't quite smart enough to figure out what you're trying to do):
A(1:10,1:10,:) = [0 255 0];Run
image(A) again to see the difference. To close the image,
you can run either of these > close > close all
Another image display tool You may notice that the square of white
pixels is not, in fact, a square. This is due to matlab's default size for the
image, which the data has been stretched to fit. In order to see the image as it
really is, there is an image display script named
/cs/cs153/matlab/visioncode/imframe.m . If you copy it (and its
companion imframecallbacks.m) to your working directory (or, better
yet, add /cs/cs153/matlab/visioncode to matlab's path, you can see
what the function does with
> help imframeTry it with
> imframe(A);You should see the same image, now at its intended size.
Try out the different widgets in the window:
If you're working on the graphics machines (Sun Ultras), you may not get 24
bits of color as a default from matlab. (This is because the root window is only
8 bits deep.) In any case, if you look into imframe.m you will see
the following lines commented out:
% include the line below to get a 24-bit color window on the graphics
%   machines
%
% set(figureHandle,'XVisual','0x29');          % for graphics machines
If you uncomment that last line, you should get 24 bit color. (You will have to create your own
imframe.m in your directory. Just make sure
that your directory appears in your path list earlier than
/cs/cs153/matlab/visioncode .
The features of imframe (and lots more features) are available from image-manipulation programs like xv. Feel free to use those if you wish. A couple advantages of imframe are that you can use it directly within matlab and that you can alter it to your liking.
There are also lots of programs for converting images from one type to another or for manipulating images. Feel free to use your favorite one (xv, gimp, ee, imagemagick, photoshop, etc.). For example, if you would like to load an image into matlab, but it's in GIF format, you can load it into xv, convert it to TIFF, and then pull in the converted image to matlab for processing.
Color Bands
Pixels are the starting point for most (but not all)
image interpretation. To get comfortable at fiddling around with pixels, try
setting all of the green components of the image A to zero to see the
effect it will have. (Remember, matlab is good at manipulating matrices. To set
all of the green components to 0, you don't need to write a pair of nested
for loops, you can just write A(:,:,2) = 0. Try zeroing and
saturating (setting to 255) other color bands. Remember you can always reset
A with the imread command.
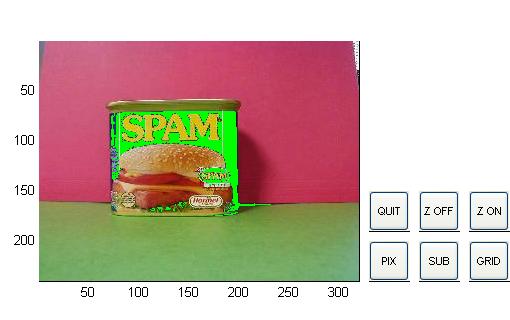
Selecting Pixels
Try to write a matlab script or function that
changes all of the blue pixels in the image
/cs/cs153/Images/a1/spamResource/spamplain1.jpg to be completely green
([0 255 0]). This is difficult, because you need to decide exactly what "blue"
means... . It may be a helpful lead-in, however, to the final part of this
project. Include a link to your code, along with a short explanation of what you
did and how well you feel it works (at most a paragraph).